Day 9 of the 30 Day Craft Challenge - with todays word being
~Stamp~
I thought today I would take the opportunity to do a quick tutorial on "Stamp Making"!
I love stamps and love doing my own designing so loved the idea of creating my own stamp designs with some of the commercial stamp making machines on the market.
Though also being a thrifty shopper I was not keen on the idea of spending upwards of $250 on a stamp making kit. So I turned to my trusty friend "Google" and discovered a cheaper way to go.
Before I get started and you go out and buy the supplies for this tutorial I have to disclose that it does take a bit of practice and can still be hit and miss with certain designs and words do not work very well with this technique, having said that I have acheived some great effects.
Tools needed:
* UV lamp
( 9V with 6 bulbs - the same as a nail technician would use, you can find these on Ebay for around $35 - $40)
* Transparencies
(If you only have an inkjet printer you will need to buy the ones specific for inkjet printers)
You can get them lazer printed for you at places like office works quite affordably
* Photopolymer image packs for stamps
(I use the Teressa Collins ones as the are affordable and come in a nice neat packet)
* Two acrylic blocks
You will also need:
* Two small trays
(I use chinese containers because they fit well in the small space in my UV lamp)
* Warm soapy water
* Nail or hard brush
* Scissors
* Timer
Directions:
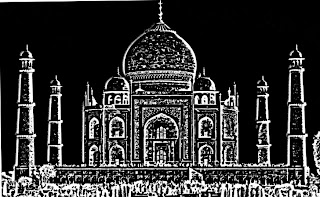
First you will need to create a design for your stamp - for mine I used a picture of the Taj Mahal I had taken when I was in India. I used photoshop to turn it black and white as well as the magic wand tool to cut out the back ground and I believe I also used a pencil filter on it as well. I then inverted the colours so the black was white and the white was black and then printed it onto transparency with my laser printer.
Original Photo
Photoshop altered photo before it was inverted
Inverted Image
I then took my image pac (make sure you dont subject it to, too much light as they are photosensitive) and placed it on the acrylic block with transparency on top of imagepac and second acrylic block placed firmly and evenly on top of pac and transparency.
Put into UV box and turn on light and expose for 3 mins.
Turn off light take out and cut open pac.
I find it works the best if you scrub the gel pac with out to much water on the brush until you have most of the non exposed (where the black of the picture is) stamp removed.
Then continue scrubbing in warm soapy water until you have removed all the unwanted gel and the hardened (white area) area only remains.
Once this is done, place into the second chinese container with clear water and expose for a further 2 mins.
This is my final result.
Hope you have fun with this tutorial and can create some of your own fun designs...
And now here are a few entries from yesterdays word
~Patch~
Linda Bromley made this gorgeous card.
A Patch work quilt made by Carol McCann
And beautiful card by Erin Applebee
Thanks everyone for following along with me on this challenge, so much inspiration to get from all the great participants entries.... more tomorrow!
Kate xx


No comments:
Post a Comment